目次
Windows10 のタスクバーの通知領域に表示するアイコンを選択(設定)する方法を紹介します。
タスクバーの右の方にある「通知領域」にはさまざまなアイコンが表示されています。
「この部分」のアイコンは表示/非表示を選択(設定)することができます。
非表示のアイコンは
タスクバーの通知領域に表示するアイコンを選択(設定)
それでは実際に設定してみましょう。
「個人用設定」をクリックしましょう。
左メニューの「タスクバー」をクリックしましょう。
画面を下へスクロールし
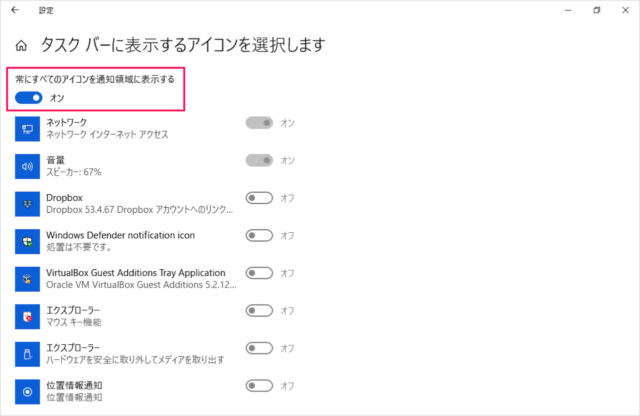
「タスクバーに表示するアイコンを選択します」をクリックしましょう。
- 常にすべてのアイコンを通知領域に表示する
が「オフ」になっています。
この設定が「オフ」の場合は
- オン → 通知領域に表示
- オフ → 「吹き出し」部分に隠す

- 常にすべてのアイコンを通知領域に表示する
を「オン」にすると
こちらも合わせてご覧ください。
- Windows10 - タスクバーを自動的に隠す
- Windows10 - タスクバーのボタンをカスタマイズ(小さいアイコン、ラベル)
- Windows10 - タスクバー - 検索ボックスを非表示に
- Windows10 - タッチキーボードアイコンの表示/非表示
- Windows10 - タスクバーのシステムアイコンを表示/非表示
Windows10 タスクバーの設定
タスクバーのその他の設定や使い方はこちらをご覧ください。
Windows10の使い方と設定
その他の使い方や設定はこちらをご覧ください。
Windows 10 タスクバー
- Windows 10 タスクバーの使い方と設定まとめ
- Windows 10 タスクバーを自動的に隠す
- Windows 10 タスクバーの色付け(アクセントカラー)
- Windows 10 タスクバーをロック(固定)する
- Windows 10 タスクバーの位置を変更する
- Windows 10 タスクバーのボタンをカスタマイズ(小さいアイコン、ラベル)
- Windows 10 タスクバーにアプリをピン留め/はずす
- Windows 10 タスクバーのアプリをショートカットキーで起動
- Windows 10 フォルダーのショートカットをタスクバーに設置
- Windows 10 コントロールパネルをスタート・タスクバーに配置(ピン留め)
- Windows 10 仮想デスクトップ - すべてのウィンドウをタスクバーに表示
- Windows 10 タスクバーの通知領域に表示するアイコンを選択(設定)
- Windows 10 タスクバーのシステムアイコンを表示/非表示
- Windows 10 タッチキーボードアイコンの表示/非表示 - タスクバー
- Windows 10 「今すぐ会議を開始する」を非表示に - タスクバー
- Windows 10 タスクバーにデスクトップ・ツールバーを追加する方法
- Windows 10 タスクバーの天気・ニュースを表示/非表示にする
